ネットワークブーティング(PXE)とは何ですか?どのように使用できますか?

問題のあるコンピュータのトラブルシューティングまたは診断が必要で、ユーティリティCDの場所を忘れたことがありますか?FOGでネットワークブーティング(PXE)を利用して、その問題を過去のものにする方法を紹介します。
h.koppdelaneyによる画像
PXEの概要
愛情を込めて発音されるPixie(フェアリーダストのように)であるPXE(Pre eXecution Environment)は、ネットワークカードのみを使用してエンドコンピューター(クライアント)を起動させる方法です。この起動方法は1999年に作成されたもので、問題のコンピューターがネットワークに接続されている(そしてこの標準をサポートしている)限り、通常の起動手順(IEの電源オン–> BIOS –> HD /)を回避できます。 CD)そして、トラブルシューティングから、liveOSの使用、さらにはマシンの再イメージングまで、いくつかの気の利いたことを行います…。しかし、私たちは自分より進んでいます。最初に戻りましょう。
PXEを使用すると、起動プロセスが通常の順序から次のように変更されます。
電源オン–> BIOS –>ネットワークカードのPXEスタック–>サーバーからクライアントのRAMにTFTPを使用してダウンロードされたネットワークブートプログラム(NBP)–>次のステップ(別名第2段階のブート)を実行するNBPの責任。
「PXElinux」NBPを使用すると、クライアント用に複数のPXEブートプログラム用にサーバーをセットアップできます。ある意味で、それは私たちが上記のすべてを実行し、次にいくつかを実行することを可能にする秘密の成分です。プロセス全体、その歴史、およびプロセスとgPXE(より進化したいとこ)が可能にするインフラストラクチャオプションの詳細については、開発者によるYouTubeのこの講義を参照してください。また、以下は、起動の可能性のいくつかをすばやく説明する2008年のセットアップのビデオです。
ゴール
このガイドは、PXEingに関する一連のガイドの最初のものになります。このガイドでは、今後の記事で構築する基礎を築きます。
推奨事項、前提条件、および前提条件
- テストしているクライアントマシンはPXEブートをサポートしており、それを有効にする方法を知っています。
- このガイドは、Debian Squeeze、Ubuntuサーバー9.10、およびLinuxMint10を使用して作成およびテストされています。したがって、Debianベースのシステムも使用できると想定されています。
- 単純なファイルサーバー用にソフトウェアRAIDをセットアップする方法と、ネットワークリンクアグリゲーション(802.3ad)をセットアップする方法を確認することをお勧めします。この種のサーバーでは、ディスクとネットワークの帯域幅の需要が非常に速くなる可能性があるためです。ネットワークおよびディスクサブシステムの復元力が高いサーバーを基盤として構築することを強くお勧めします。
- 私がVIMをエディタープログラムとして使用しているのがわかります。これは私がそれに慣れているからです…他のエディターを使用してもかまいません。
設置–FOGを活用した重労働
FOGは、* ChuckSyperskiとJianZhangによって作成された無料のオープンソースコンピュータークローンソリューションです。FOGは、定期的に利用可能なソフトウェア(Apache、MySQL、tftpd-hpaなど)を取得し、それらを無料の製品化されたPCライフサイクル管理(PCLM)ソリューションにパッケージ化します。この無料のPCLMを使用すると、コンピューターの状態を画像化してバックアップし、プログラムと設定(IE Firefox、Office、プリンターなど)および構成ポリシー(IE自動ログオフとスクリーンセーバー設定)を展開して、1つでいくつか言及することができます。中央のWebインターフェイス。
注:FOGに関するChuckとJianのインタビューは、TightwadTechで入手できます。
PXEサーバーの基盤としてFOGを使用することは、TFTPや、必要に応じてDHCPを手動でインストールして構成することなく、必要なすべてのパーツを配置するための優れたショートカットであり、FOGのすべての機能をボーナスとして提供します。
私たちの目標は、このすでに優れたシステムに機能を追加することであるため、FOG自体の使用方法や、そのインストール手順については詳しく説明しません。FOGのwikiには、書面とビデオのハウツーがあり、詳細な情報を入手するのに十分な堅牢性を備えています。要約された手順は次のとおりです。
sudo mkdir -p /opt/fog-setupDownload the latest FOG packagefrom sourceforge to the directory created in the previous step.Extract the package and start the installation.sudo tar -xvzf fog*You will be prompted several times by the installer:
3. What is the IP address to be used by this FOG Server? [server-IP-detected-on-eth0] – Enter.
10. Acknowledge and follow the on screen instructions for “MySQL“.
11. Leave the MySQL password blank for the root account.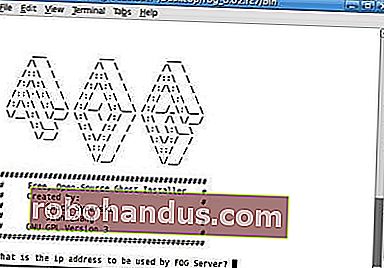
Image from the FOG wiki.Go to the Fog address with your browser and follow the on screen instructions.

*Note: Assuming you do NOT have another DHCP or that it is not setup to handle PXE. If you want to configure your existing DHCP, see Configure DHCP for PXE.
As far as installing FOG goes, that should be it. Again, while FOG is a great system, using it, is not the focus of this guide, and we encourage you to head over to it’s wiki so you can get a better grasp of FOG’s abilities and how it can help you to manage your clients lifecycle.
If all when well you should be able to PXE boot your client machine (usually F12) and get greeted by FOG’s default menu.

As a quick “taste of things to come” you may select the “Run Memtest86+” option and get greeted by the Memtest program we covered in our “Diagnose PC Hardware Problems with an Ubuntu Live CD” guide.
File and directory Structures
As stated earlier, our aim is to extend FOG’s abilities and to that end we will need to add some files and directories.
Create the subdirectory structure:
sudo mkdir -p /tftpboot/howtogeek/menus
These sub-directories will serve as templates for all the pictures, programs and configurations we will use to extend FOG.
Adjusting the “default” configuration file
We will build a new main menu, and put all of the FOG functions into their own sub-menu.
Copy the /tftpboot/pxelinux.cfg/default configuration file into howtogeek/menus/fog.cfg
sudo cp /tftpboot/pxelinux.cfg/default /tftpboot/howtogeek/menus/fog.cfg
Now edit the content of the original “default” file:
sudo vim /tftpboot/pxelinux.cfg/default
Make its content look like this:
DEFAULT vesamenu.c32
LABEL FOG
KERNEL vesamenu.c32
APPEND howtogeek/menus/fog.cfg
LABEL Utils MENU
LABEL Linux
LABEL fog.local
When we finish, this configuration will give you 3 sub-menus: “Utilities”, “Manual FOGing”, “Linux stuff”.
Create the “master” file
The master file allows us to make global changes to the look and feel of the menus without reentering them individually over and over. Things like the default background picture, border stile, position Etc’, will all be consolidated in this master.cfg file.
Create the file:
sudo vim /tftpboot/pxelinux.cfg/master.cfg
Make it’s content look like:
MENU BACKGROUND fog/genie.png
MENU MARGIN 0
The configuration above, will create the purple borders and highlighting, if you whish to have a different look and feel, simply change the values.
To set a background picture, put a picture in the “/tftproot” directory and point the “MENU BACKGROUND” to the picture’s relative path (we recommend using pictures with resolution of 640*480). For example the full path for the above configured picture would be: “/tftproot/fog/bg.png“.
Connect the FOG sub-menu to the main menu
Because we made a simple copy of the original configuration file into the menus sub-directory (keeping its color schema, timeouts and alike), if you go into this sub-menu now from the PXE booted client, it would work, but you will not be able to return to the main menu without rebooting the machine.
So edit the /tftpboot/howtogeek/menus/fog.cfg file:
sudo vim /tftpboot/howtogeek/menus/fog.cfg
Add this entry after the “menu color title” entry and before the FOG functions:
LABEL back
Create the sub menu skeletons
We have created 4 sub-menus, three of them are up to us to fill. To do so, lets create the template that we will be building on.
Create the template file:
sudo vim /tftpboot/howtogeek/menus/template.cfg
Make this its content:
MENU INCLUDE /pxelinux.cfg/master.cfg
Lets set the stage for additional sub-menus, which will be covered in future guides:
cd /tftpboot/howtogeek/menus/
That’s it, the basic layout is now ready and from now on, we only need to build upon it, which we will in future guides. Until these future guides arrive, you are encouraged to get familiar with FOG as it is an exciting ride upon it’s self.
Update: The future is here :)
How To Network Boot (PXE) The Ubuntu LiveCD
Go FOG yourself